 -
-背景
我在网上发现了一个可爱的小猫,这是它的源码地址:https://github.com/adryd325/oneko.js。由于它是基于 JavaScript 实现的,我用 React 重新复刻了一下。
实现
首先,我们在屏幕上放一只小猫。这里使用的是一张 sprite 雪碧图,可以在这里下载: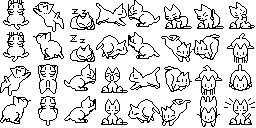
"use client"

export default function MyCat() {
  return (
    <div
      className="fixed pointer-events-none z-50"
      style={{
        width: `32px`,
        height: `32px`,
        backgroundImage: "url(/cat.gif)",
      }}
    />
  )
}
现在屏幕上已经有一只小猫了!我们来调整它的位置,让它显示在左上角。
  <div
      className="fixed pointer-events-none z-50"
      style={{
        width: `32px`,
        height: `32px`,
        backgroundImage: "url(/cat.gif)",
      + backgroundPosition: "-96px -96px",
      + left: "16px",
      + top: "16px",
      + zIndex: 2147483647 // 2 ** 31 - 1
      }}
    />
为了让小猫能够"追"到鼠标,我们需要监听鼠标的移动。
const mousePosXRef = useRef(0)
const mousePosYRef = useRef(0)
const handleMouseMove = (event: MouseEvent) => {
  mousePosXRef.current = event.clientX
  mousePosYRef.current = event.clientY
}

useEffect(() => {
  window.addEventListener("mousemove", handleMouseMove)

  return () => {
    window.removeEventListener("mousemove", handleMouseMove)
  }
}, [])
现在设想一下:我们有一个目标点 (x, y),需要让小猫到达这里,要怎么实现呢?答案是:用动画。
function frame() {
  // 小猫移动
}

function onAnimationFrame(timestamp) {
  frame()
  requestAnimationFrame(onAnimationFrame)
}

requestAnimationFrame(onAnimationFrame)
每一帧动画里,都让小猫向鼠标位置靠近一点。
const catPostXRef = useRef(32)
const catPostYRef = useRef(32)

const diffX = mousePosXRef.current - catPostXRef.current
const diffY = mousePosYRef.current - catPostYRef.current

const distance = Math.sqrt(diffX ** 2 + diffY ** 2)

catPostXRef.current += (diffX / distance)
catPostYRef.current += (diffY / distance)

catPosXRef.current = Math.min(
  Math.max(16, catPosXRef.current), // 至少为 16
  window.innerWidth - 16 // 不超过窗口宽度 - 16
)
catPosYRef.current = Math.min(
  Math.max(16, catPosYRef.current),
  window.innerHeight - 16
)

if (containerRef.current) {
  // 小猫以中心点定位(32px / 2 = 16px)
  containerRef.current.style.left = `${catPosXRef.current - 16}px`
  containerRef.current.style.top = `${catPosYRef.current - 16}px`
}
现在小猫可以跟随鼠标移动了。为了避免它一直抖动贴着鼠标,我们加一个条件判断,离得够近就停下来:
if (distance < 48) {
  return
}
另外,我们希望小猫是一段一段地移动(而不是每帧都动一丁点),所以再引入一个速度变量 CAT_SPEED,以及帧间隔 FRAME_DELAY:
const CAT_SPEED = 10
const FRAME_DELAY = 100

...

catPosXRef.current += (diffX / distance) * CAT_SPEED
catPosYRef.current += (diffY / distance) * CAT_SPEED
...

function onAnimationFrame(timestamp) {
  if (!lastFrameTimestampRef.current) {
    lastFrameTimestampRef.current = timestamp
  }

  if (timestamp - lastFrameTimestampRef.current > FRAME_DELAY) {
    lastFrameTimestampRef.current = timestamp
    frame()
  }

  requestAnimationFrame(onAnimationFrame)
}
- 不同动作的图片 到这里小猫已经可以跟随鼠标了,但它只有一个动作。我们希望它能有不同的动作,比如朝不同方向奔跑、睡觉等等。
假设我们有八个方向:
{
  N: "北",
  S: "南",
  W: "西",
  E: "东",
  NE: "东北",
  SE: "东南",
  SW: "西南",
  NW: "西北"
}
当我们移动鼠标的时候,我们需要去判断小猫位于鼠标的方向,这样才能控制跑过来的时候是以什么形态。
let direction = ""

// 判断垂直方向(上下)
if (diffY / distance > 0.5) {
  direction += "S" // 南(下)
}
if (diffY / distance < -0.5) {
  direction += "N" // 北(上)
}

// 判断水平方向(左右)
if (diffX / distance > 0.5) {
  direction += "E" // 东(右)
}
if (diffX / distance < -0.5) {
  direction += "W" // 西(左)
}

// 如果没有明确方向(角度太小),默认为 idle
if (!direction) {
  direction = "idle"
}
有了方向之后,我们需要给小猫进行帧动画,不然有了方向也没有意义。 首先,我们先给帧进行分组:
const spriteSets: Record<SpriteName, number[][]> = {
  /** 空闲状态 - 静止不动 */
  idle: [[-3, -3]],

  /** 警觉状态 - 刚发现鼠标移动时的反应 */
  alert: [[-7, -3]],

  /** 抓自己 - 空闲时的随机动作,3帧动画 */
  scratchSelf: [
    [-5, 0],
    [-6, 0],
    [-7, 0],
  ],

  /** 抓北墙(上方) - 当小猫靠近屏幕顶部时可能触发 */
  scratchWallN: [
    [0, 0],
    [0, -1],
  ],

  /** 抓南墙(下方) - 当小猫靠近屏幕底部时可能触发 */
  scratchWallS: [
    [-7, -1],
    [-6, -2],
  ],

  /** 抓东墙(右侧) - 当小猫靠近屏幕右侧时可能触发 */
  scratchWallE: [
    [-2, -2],
    [-2, -3],
  ],

  /** 抓西墙(左侧) - 当小猫靠近屏幕左侧时可能触发 */
  scratchWallW: [
    [-4, 0],
    [-4, -1],
  ],

  /** 疲惫状态 - 睡觉前的过渡状态 */
  tired: [[-3, -2]],

  /** 睡觉状态 - 空闲时的随机动作,2帧循环动画 */
  sleeping: [
    [-2, 0],
    [-2, -1],
  ],

  /** 向北移动(向上) - 2帧循环 */
  N: [
    [-1, -2],
    [-1, -3],
  ],

  /** 向东北移动 - 2帧循环 */
  NE: [
    [0, -2],
    [0, -3],
  ],

  /** 向东移动(向右) - 2帧循环 */
  E: [
    [-3, 0],
    [-3, -1],
  ],

  /** 向东南移动 - 2帧循环 */
  SE: [
    [-5, -1],
    [-5, -2],
  ],

  /** 向南移动(向下) - 2帧循环 */
  S: [
    [-6, -3],
    [-7, -2],
  ],

  /** 向西南移动 - 2帧循环 */
  SW: [
    [-5, -3],
    [-6, -1],
  ],

  /** 向西移动(向左) - 2帧循环 */
  W: [
    [-4, -2],
    [-4, -3],
  ],

  /** 向西北移动 - 2帧循环 */
  NW: [
    [-1, 0],
    [-1, -1],
  ],
}
举个例子,如果希望小猫移动,是不是需要两张图片,循环播放,这样才能体现出奔跑的感觉。如果只有一个图片,那小猫就像踩着轮滑过来的,一动不动。 然后,我们在每一次动画的时候,播放一帧:
/** 动画帧计数器 - 用于循环播放多帧动画 */
const frameCountRef = useRef(0)

const setSprite = (name: SpriteName, frame: number) => {
  // 从 spriteSets 中获取对应状态的帧数组
  const spriteArray = spriteSets[name]

  // 使用取模运算循环播放多帧动画
  // 例如:如果有 2 帧,frame = 0,1,2,3... 会循环显示 0,1,0,1...
  const sprite = spriteArray[frame % spriteArray.length]

  if (containerRef.current) {
    // 计算 CSS background-position 的值
    // sprite[0] 是 X 坐标(负数),sprite[1] 是 Y 坐标(负数)
    // 乘以 SPRITE_SIZE (32) 转换为像素值
    containerRef.current.style.backgroundPosition = `${sprite[0] * SPRITE_SIZE}px ${sprite[1] * SPRITE_SIZE}px`
  }
}

setSprite(direction as SpriteName, frameCountRef.current)
好了,现在小猫就有奔跑的感觉了。现在再增加一些其他动作,否则看上去很单调。当小猫跑过来之后,我们可以让小猫做一些睡觉、抓痒之类的动作。 我们统一放到idle函数里面:
const idle = () => {
  // 增加空闲时间计数(每调用一次 +1)
  idleTimeRef.current += 1

  /**
    * 随机触发空闲动画的逻辑
    * 条件:
    * 1. 空闲时间超过 10 帧(约 1 秒)
    * 2. 随机数等于 0(约 1/200 的概率,即每约 20 秒触发一次)
    * 3. 当前没有正在播放的空闲动画
    */
  if (
    idleTimeRef.current > 10 &&
    Math.floor(Math.random() * 200) === 0 &&
    idleAnimationRef.current === null
  ) {
    // 基础可用的空闲动画列表
    const availableIdleAnimations: SpriteName[] = [
      "sleeping", // 睡觉
      "scratchSelf", // 抓自己
    ]

    // 根据小猫位置,添加可用的抓墙动画
    // 如果小猫靠近某个边界,就可以抓那个方向的墙

    if (catPosXRef.current < 32) {
      // 靠近左边界,可以抓左墙
      availableIdleAnimations.push("scratchWallW")
    }
    if (catPosXRef.current < 32) {
      // 靠近上边界,可以抓上墙
      availableIdleAnimations.push("scratchWallN")
    }
    if (catPosXRef.current > window.innerWidth - 32) {
      // 靠近右边界,可以抓右墙
      availableIdleAnimations.push("scratchWallE")
    }
    if (catPosXRef.current > window.innerHeight - 32) {
      // 靠近下边界,可以抓下墙
      availableIdleAnimations.push("scratchWallS")
    }

    // 从可用的动画列表中随机选择一个
    idleAnimationRef.current =
      availableIdleAnimations[
        Math.floor(Math.random() * availableIdleAnimations.length)
      ]
  }

  // 获取当前空闲动画状态
  const idleAnimation = idleAnimationRef.current
  const idleAnimationFrame = idleAnimationFrameRef.current

  // 根据空闲动画类型,播放对应的动画
  switch (idleAnimation) {
    case "sleeping":
      // 睡觉动画
      if (idleAnimationFrame < 8) {
        // 前 8 帧显示"疲惫"状态(准备睡觉)
        setSprite("tired", 0)
        break
      }
      // 之后每 4 帧切换一次睡觉动画帧(2 帧循环)
      setSprite("sleeping", Math.floor(idleAnimationFrame / 4))
      if (idleAnimationFrame > 192) {
        // 192 帧后(约 19.2 秒)结束睡觉,重置动画
        resetIdleAnimation()
      }
      break

    case "scratchWallN":
    case "scratchWallS":
    case "scratchWallE":
    case "scratchWallW":
    case "scratchSelf":
      // 抓墙和抓自己的动画处理
      // 直接播放对应动画的帧
      setSprite(idleAnimation, idleAnimationFrame)
      if (idleAnimationFrame > 9) {
        // 10 帧后结束动画,重置
        resetIdleAnimation()
      }
      break

    default:
      // 默认状态:显示普通空闲动画
      setSprite("idle", 0)
      return
  }

  // 增加空闲动画帧数
  idleAnimationFrameRef.current += 1
}

if (distance < 48 || distance < CAT_SPEED) {
  idle() // 调用空闲处理函数
  return
}
现在小猫停下来之后就会有各种随机的动作了。我们还希望当我们继续移动的时候,小猫首先要有一个警觉的动作,好像感到突然发生了什么,然后才去奔跑。
// 重置空闲动画(因为开始移动了,不再是空闲状态)
idleAnimationRef.current = null
idleAnimationFrameRef.current = 0

/**
  * 如果刚从空闲状态恢复,显示 alert 状态
  * 这是一个过渡动画,让小猫看起来像是"发现"了鼠标
  */
if (idleTimeRef.current > 1) {
  setSprite("alert", 0) // 显示警觉状态的精灵图
  // 限制最大值为 7,然后递减,用于过渡动画
  idleTimeRef.current = Math.min(idleTimeRef.current, 7)
  idleTimeRef.current -= 1
  return // 这一帧只显示 alert,不移动
}
至此,我们就完成了这个可爱的小猫。